Follow Ryan and Tricia as they plan, build, plant and care for their first garden. As chefs, they want the freshest food available, and what better way than with their own garden?

Tuesday, March 24, 2015

Mixing the Topsoil

March 24th, 2015

Over the weekend, Ryan and I finished filling our garden beds. Last weekend, we tilled and built our beds.
I've been spring cleaning my flower beds and decided to keep the old mulch and leaves to mix into the topsoil we added to our beds. This wasn't mulch that was one to two years old, this was old enough to have decomposed a bit and broke down. I made sure not to incorporate the still-colored mulch from last year.

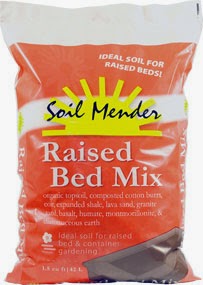
Ryan went to Skinner's and bought a yard of topsoil for $57. We put about half in each bed. Last year, when cleaning up leaves around the house, we saved them in trash barrels. I threw those down before adding the topsoil, then mixed in the old, decomposing mulch and more leaves into the topsoil with a hoe. We also added a bag to each bed of raised bed garden mix, (left).

I mixed in old mulch, topsoil and raised bed mix.
At first, we didn't have a hoe and we were using shovels to mix the dirt, old mulch and raised bed mix. Believe me when I say it's worth the $20 for a hoe. It makes everything much easier to handle. I also bought a metal rake, which helped even everything out when I was done. It worked well to mix together the materials, but the hoe worked better, fo' sho'.

I also bought a hand-crank compost container. Ryan and I discussed what kind to get, since we have animals and a small back yard, we opted for this type. We didn't want our dog, or other neighborhood animals for that matter, to get into our compost pile. This also makes it so we don't have to have to go out and mix it around ourselves. It's really easy, you just crank it. I got lucky buying mine because the box was rotting and the legs of the compost-holder were slightly rusted. Lowe's gave me a 50 percent discount, so I only paid $50 for mine. You can find them online for $80 plus shipping, and up.

Now, all I gotta do is water the garden for a couple weeks and see if any weeds volunteer themselves before I actually plant. In that time, Ryan and I will talk about what to plant. That will be my next post.


Sunday, March 15, 2015

The First Day -- Tilling and Building

Sunday, March 15, 2015

Today, Ryan and I tilled up the ground where we plan to plant. We had to borrow a small, motorized tiller from some friends, which was great because we didn't really want to buy one or rent one, which you may have to do if you don't have generous friends or family who already own one.

 The tilling took about an hour, as we have very clay-like dirt in the area where our permanent beds are going. Ryan did most of the tilling (as in ALL of it) so I cleaned up the rest of the yard while he tilled. I'd say he went about 6-8 inches down.

We aren't planning to mix this soil with the topsoil and potting soil we plan to put on top. The plan is to till this dirt up, top it with old leaves and grass clippings from last fall, then top that with the topsoil and finally with potting or gardening soil concentrated in the spots where we plant. We're going to leave the garden beds for a couple weeks and water it to make sure any weeds or grass that grows can be easily removed. I used this article, from Mother Earth News for reference: http://ow.ly/Kmxki.

Why till? Why not just throw some dirt on top of the grass? I read in that article and a few others that the more room the veggies have to grow their roots, the healthier and they will be and more will grow. This way also, you won't have as many weeds and possible grass growing though into your garden. There are ways to do this without tilling, and that same article posted above addresses how to do that if you're interested.  Another article that came in handy was this one: http://ow.ly/KmGUk.

I found another article, only this one to help me build my permanent beds, in the Spring 2015 Capper's Farmer. It's called Easy-to-Build Raised Gardening Plans Using Reclaimed Lumber and used the basic guidelines from there. Unfortunately, the article isn't posted online, yet.

Our beds are 4'x8', so we used 8 foot 1x6 boards and 4 foot 1x6 boards and fastened them to  4x4s. They aren't perfectly even, but we don't care. We just wanted something to help keep our animals out, and our neighborhood has a ton of rabbits and squirrels. Plus, the boards will settle and be uneven, anyway. We weren't worried about them being perfect. For more information about how we built these beds, read the captions on the photo slideshow below.

After setting up the beds, we wrapped them in gardening wire to keep rabbits and our very own dog, Zoey, out of the beds. I'm hoping our cat and the neighborhood cats will stay away.

Now we just have to get a truck and buy a load of dirt to fill the beds. That will be another post. Stay tuned.


Just an Idea

March 15, 2015

Today, Ryan and I created the plots for our new, permanent gardening beds.

We've talked about this for a couple of years now, so this is a huge step. In the past we've tried container gardening, and had little luck. The plants had to be watered so often and we worked so much, that just wasn't happening. Now, we are more prepared and willing to spend time out in the dirt to grow food that we can eat, can and share with our family and friends.

As chefs, we are always looking for the freshest ingredients to cook with. What better way than growing your own food?

Last year, many of our friends and family members had their own gardens. When they ended up with too much produce, they would "pawn" it off on us. So much so we ended up having too much, too. So we canned and froze a lot of it. As we were doing so, Ryan and I kept telling each other how much fun it was and how great it would have been if we had grown it all ourselves, too. So began the conversation.

In January 2015 I was hired as an editorial intern at Mother Earth News, a magazine dedicated to "living wisely". Many of their articles focus on gardening, farming, sustainable energy and food. As an intern, I get to read all kinds of cool articles about food and gardening and do-it-yourself. It's really inspiring! So I started doing some research while doing my job at the same time (how cool is that?) and asking the editors for their advice and any tips they had. Between their advice and the articles online, I had plenty of knowledge to get me started.

So this blog will be dedicated to sharing my and Ryan's first gardening experiences. Our fails, our triumphs and everything in between. I hope to post pictures and even continue this fall with canning and freezing experiences.

So stay tuned. Follow two chefs as they learn to garden together. If you have any tips or helpful hints for us, please comment below in the comments section.